Archive for August, 2008

Aug 22 2008

Stove Repair: Homestrand Model 206 Alcohol 2-Burner Stove

One of the items on the long list of todos is to repair the Homestrand Model 206 Alcohol 2-burner stove on the Ericson 29.

After a little productive searching on the Internet, I found a nice company in Brewerton, NY that sells original repair kits.  So, I called them and ordered one–or, two rather  (one for each burner).  They arrived today, in perfect condition with a hand-written note, printed instructions, and a postcard of their boat yard.  So cool!

If you need Homestrand Model 206 (or 209 or other) Alcohol Stove parts, they have them:

ESS-Kay Yards (on the Erie Canal)
Brewerton, NY
By Phone: 315-676-2711
On the Internet: www.ess-kayyards.com

Note: You can order things online–they have a shopping cart and payment processing, but at the time of this writing, it does not use SSL technology–so, your credit card and info goes all over the Internet unencrypted.  They said they are working on it.

I’ll post a tutorial when I am finished rebuilding the stove.
One response so far

Aug 18 2008

Ericson 29: Transom conclusion

After crawling around below the cockpit sole, there was absolutely no evidence of a collision.  Furthermore, there is another Ericson 29 on the hard nearby with the same full-length cracking along the top of the transom.

The material that has actually split is a dark gray with some un-catalyzed fiberglass flakes in it.  Underneath, there is plenty of glass holding things together on the inside edge, but my guess is that the outer edge was stuffed with filler.  This seam across the transom is the only place where the hull-to-deck joint is not bolted together.

I am going to clamp the area together and fill the whole thing with epoxy–allow it to cure and basically glue the whole thing together (there is no worry about the structural integrity here–the transom is sound).

No responses yet

Aug 18 2008

Project Update: Teak Cabin Hatch Boards Restoral

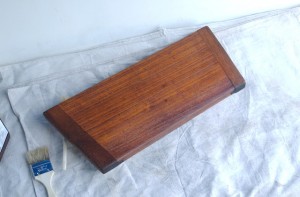
Stripped and re-finished hatch board

Stripped and re-finished hatch board

I have completed the first board, and I love how it looks.

These boards get quite a bit of use, and as a result, I wanted to use Teak Oil, rather than varnish.  In my mind, it is easier to keep them oiled than it would be to keep them varnished.  With the boards getting used dozens of times a day, the chances are pretty great that varnish would get chipped or marred.  (I am sure my opinions will change after a few seasons of this.)

The board cleaned up really well with just water and a stiff, plastic bristle brush.  I used the Interlux Teak Restorer additionally to get some of the stains out of the wood.  By the time it was dry, the wood was white.

As per the directions on the Interlux Teak Oil, I brushed on a coat after the board was dry, waited until it was dry to touch, and applied a second coat.  I let that dry for the remainder of the day, and honestly, it needed more.  That wood was THIRSTY!

The interior side is perfect.  The exterior side still has a really pronounced grain that is a bit course to the touch.  I am going to hand sand it with 80-grit, then 150-grit sand paper, wipe away the dust, and then re-apply the Interlux Teak Oil.

No responses yet

Aug 17 2008

Project: Ericson 29 Teak Cabin Hatch Boards Refinish

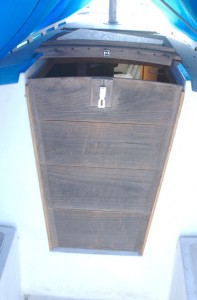
Hatch boards before they were stripped and refinished

Hatch boards before they were stripped and refinished

This is the BEFORE picture of the Cabin Hatch Boards on the Ericson 29.  They are teak, well-weathered and ready for a refinishing.

I chose Interlux Teak Restorer, and Interlux Teak Oil.  The grain has become a bit pronounced, so I may be doing a bit of sanding later to return them to their previous smoothness.

I’ll post pictures as I go.

One response so far

Aug 14 2008

Ericson 29: Transom repair update

Another guy from the marina (who has an Ericson 27) came over today and we looked at the transom together.  I needed another set of eyes to verify what I was seeing.

The crack across the transom goes nearly all the way across–right along the top.  But, the crack is not in the fiberglass: it appears to be some other material that was used along the top of the transom.  And, whatever that material was, it appears to have sheared from the stress.

The backstay is attached, of course, and definitely holding the transom in-place.  I am not worried about it coming apart.  The next step is to determine where, when, and why this other material was added.  I will be looking for evidence of a collision . . . and this to be part of the repair process.

Tomorrow, it looks like I will be crawling around below decks.

No responses yet

Aug 13 2008

Ericson 29 Inspection: Split along the Seam of the Transom

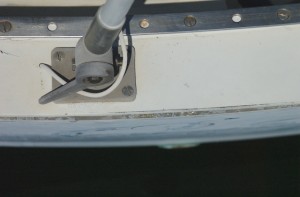
Crack along the transom of an Ericson 29

Crack along the transom of an Ericson 29

Upon most accounts, the Ericson 29 is a stoutly-built boat that could handle the Blue-water conditions of cruising.  It will be small, and have a maximum hull-speed of 6.7 knots/hr, but it will be manageable.

The smaller boat might actually be more forgiving in many places.  There are not as many things to break, a smaller boat is easier to maneuver, and has a shorter mast.  It is less helm on the tiller, and the keel is shorter–so, I can get in a little closer to shore.

A longer, heavier boat wouldn’t get tossed around as much in heavier seas, and the extra waterline would mean faster days.  But, the cost of the boat is more, as well as every other thing.

And, I already own the Ericson 29.

There is this nasty little split along the seam of the transom, however (see picture).  It appears as if the top portion of fiberglass did not bond properly to the actual transom.  If it is repairable and does not pose any danger to the structure of the boat, perhaps it is not a big deal.

I am going to have to hire a marine surveyor to tell me if this boat is worth preparing for the voyage, or not . . . .

No responses yet

Aug 12 2008

Crazy Idea: Crossing the Pacific–Sailing to Hawaii

I have this cray idea . . . to leave for Hawaii in December–after Christmas.

Actually, it is not so crazy.  It makes good sense.  It is a good time to go.  I have a couple of years of sailing experience under my belt in San Francisco–one of the best places to train on the Earth.  The boat will be complete–and ready for a trip.

To take my 2-week vacation and sail across the Pacific Ocean, and be in Hawaii for my Mom’s 60th birthday.  Once there, I can get my mail, run my business, and stay in Hawaii until June or July on the hook.

The brilliance of this idea is several fold.  It is a pretty safe crossing.  It will be going from cold to warm.  Sailing will be fresh–because I will have completed a down-the-coast sailing trip to Cabo San Lucas the month prior.  And, I’ll have my sailboat at Hawaii.

I could return to Alaska the following July and sail the boat down the coast to Cabo San Lucas the following winter–then down to Costa Rica, and to Peru and Chile during the Winter Months–where it is warm.

No responses yet

Aug 02 2008

Eye Splice: Double-Braid Rope

Although there may be fiberglass, or wood, or aluminum, or steel, it really FEELS as if a boat were held together with rope–or, lines.  The sails are attached, held up, and held down by rope (wire rope, polyester rope, cotton rope, etc.).  One of the vital skills of seamanship is the ability to work with rope.

Fortunately, I grew up with ropes.  In Boy Scouts, we learned knots, lashing, and splicing–all with single braid rope.  Now, as ropes are more important than pitching my tent, the ropes have consequently become more complex–and, more specialized.

First Splice

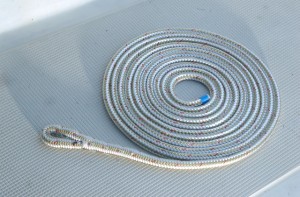
New dock line eyesplice in double-braid rope

New dock line eyesplice in double-braid rope

It may sound like a martial arts move, but it really marks my first attempt at splicing a complex rope.  I started with a useful splice: the eye splice.

This is going to be a bow-painter for the Lido-14, but I put a nice little eye splice in one end of a 20-foot section  of double-braid line.

Tools Required

  • 20-foot section of rope
  • tubular fid and pusher set (I purchased the Samson kit)
  • waxed thread
  • whipping needle

Overall, I am happy with the result–although I would prefer less bunching of in the eyelet.  I needed to pull the ends a bit tighter before I pulled the core back inside the cover.

In the next month, I will be replacing ALL of the lines, halyards, and sheets on the boat (with the exception of the lifelines–which I will be removing the plastic coating and assessing).

No responses yet